Over the DM's Shoulder

Showing posts with label maps. Show all posts

Sunday, October 13, 2024

General Mapmaking Tips

I have a passion for making maps for my homebrew setting. But I'm not an artist--I can't draw a beautiful map by my own hand. Instead, I've learned to use photoshop to create maps that achieve the look I'm going for. This does have its own challenges. I've described the general process before in my guide to making campaign maps. That guide, my most popular article on this site as of the writing of this, covers the step-by-step process of how to start with some reference images and end up with a cohesive map. But recently, I grew frustrated with the world map I've been using for the last fifteen years. I decided to revamp that map, and I'm happy with the outcome. 

This map is a recreation of my main continent, Evanoch. When I first started DMing in a serious capacity a decade and a half ago, I had created a very basic map of the continent which I was almost immediately unhappy with: 


The thing is, this older map achieves what I needed at the time. It's functional. It was easy to make. It allowed me to (1) know how to picture my world in a concrete way, and (2) communicate the basics of the location to my players. I don't regret making this map, but it made me sad because I conceived of Evanoch as a beautiful, thriving, diverse place, and the map doesn't show that. It only shows outlines. I wanted something that would capture the feel of my setting, hence the updated map. 

So in celebration of creating this new map, I thought I would share a few general tips on how to make maps like it, things I learned in the process of making this one in particular. I would say that the original region/campaign map article is still the best place to start for learning how to use photoshop to make a map, but this guide will help you take things further and offer some insights on how to focus on a continent map. 

One thing I am very pleased with is the borders of the continent. In the old map, I used just smooth lines to outline the continent, but real coastlines don't look like this. Real coastlines are rough and choppy. When I created a continent map for my wild west setting, I used a real island map and rotated it around to give me a basic shape: 


But Evanoch already had determined boundaries, and I was never going to be able to find a map that looked enough like it to really have a map that looked like Evanoch. So I improvised. I took a coastline map I found online (I searched for "coastline map") and made many duplicates, editing the copies into the shape of Evanoch and erasing overlapping segments. Here's what the process looks like: 

A single fragment of the coastline reference.

An edited addition to created a peninsula on the map.

A mirrored addition to continue the coastline south.

I continued this process for all the map landmasses until I had duplicated the approximate shape of Evanoch as I had already designed it. This is basically an extension of the process I used to create the tree shapes in the campaign map, copying and rotating the reference image until I had the shape I wanted. 

My favorite thing about this is that this new map makes Evanoch look a lot more like a real place. The wavering coastline gives the appearance of a realistic location, and the coastline process was genuinely one of the easiest parts of making this map. I would argue that hand-drawing a realistic coast is difficult, frustrating, and not terribly rewarding for people without the gift of being artistic; duplicating real coastlines to create the borders of your continent is relatively simple, easily customizable, and has a lovely finished look. 

Perhaps my favorite part of the new map is the forest appearance, particularly that of the Liggen Forest in the northeast of the continent. I took a very different approach than I did with the region map because this map's intention is not accurate depiction of geographical features--instead, it's meant to give a sense of the actual appearance of the land there in terms of plant life. So you may notice that each of the several forests in the map have different looks--that's to reflect the different types of trees in each location. Let's talk about the forest appearance. 


To start, I searched for "forest silhouette" and found this set of similarly-styled depictions of an evergreen forest skyline. I separated each into different layers so that I could work with them individually. This was done so that the look of the trees would be varied and not a repeating pattern that would be visually repetitive or bland. I then selected the pixels of each layer, created a new layer, filled the new layer (still the original's pixels) with black paint, used the "select->modify->contract-> 3 pixels" option, made sure I was selecting the new layer, and deleted the smaller shape. I then deleted the original layer and erased the bottom of the resulting shape, leading to just an outline like this:
This was the process to create individual treelines. But obviously the entire forest had much more, so I repeated the process again and again, adding more treelines on top of the existing one so that the layers together would create the impression of a dense forest. Here are several treelines together to show the collective effect of even just a few:
This is the process I used for all the forests. The northeast for this sprawling evergreen forest, there are rainforest silhouettes in the southwest, the northwest got deciduous forests, and the elven islands of Mishara are signified with mangrove trees, which are genuine to their location.

One thing I did in the map for Ramsey, my wild west location, was created different color schemes for what was land and what was water. In the first large chunks of time I spent on the new Evanoch map, I hadn't done that, and as a result, the map did not look very good. I wasn't sure that I would differentiate the water from the land with a color scheme--I wanted the map to look like a sketch. But this was something I realized needed to be done. Take a look at the difference between the flat one-color map and the water-darkened design: 


As you can see, this is a big difference. In order to create this effect, I did some steps which were simple and others which were more difficult. For starters, I used the eyedropper tool to select the color of the land and then chose a darker color in the same palette (simply picking another color in the same field without moving the color spectrum slider), creating a new layer to hold the darker color and using the paint bucket to fill in the new layer. This was simple. The harder part was getting the actual oceans, rivers, and lakes to look darker than the land. Had I created a design where the rivers attached directly to the other geographical features (like connecting the mouths of the rivers right to mountain ranges, I would have been able to use the magic wand tool to select just the connected water areas. Honestly, if I had created a layer cutting the rivers off (using a copy of the rivers, not the original) with a brush line, I could have achieved that effect. But I was enjoying the detail work process and chose instead to hand-erase all of the water areas from the land color layer, which was labor-intensive and time-consuming, but it allowed me a lot of control over the look of the water borders. Either approach would work and be valid, so it's all about what you prefer. 

One thing I had forgotten about the mapmaking process was how much time is spent re-doing some things. It had been a while since I went for a hand-drawn look with a map, and I had never created a map like that starting from an established design like my original ugly world map, but this map meant lots of finessing. I stretched river and forest boundaries well past the edge of the continent's edges in order to give myself leeway to create borders later on, and that meant that once my coastlines were in place, I needed to do a lot of erasing to make the lines all meet up. With a passion project like this, that's part and parcel of the game. It's better to have to erase a too-long line than to have to extend it later in the process, so know going in that you'll be revising throughout the process. 

One decision I really labored over was showing the lake and river lines. My first draft of this map prioritized forests, which meant that I would draw river lines up to the base of tree shapes and then have the river disappear, reappearing beyond the treeline. But as I continued, I realized this was (1) not realistic since the trees would not grow in the rivers, and (2) fairly ugly because it looked so busy. I ended up redoing most of the rivers in forested areas to address this, and I'm happy with how it came out. But this is another way that revising will enter the equation. I spent about an hour and a half redoing something I spent two hours doing that I decided I did like. I mention this because committing to the finished project, even if it's frustrating, it a part of the process. 

As I did with the campaign map article, I drew up little city icons for each of the ten most important cities in my setting so that the cities weren't just dots on the map. With the campaign map, I was still developing the Eastweald, and the look and feel of cities wasn't already established. This meant I could just use interesting designs that looked good and rationalize that that's what those cities look like. But with this map, I've been building and playing in these big cities for fifteen years. There's a determined character to each one. So I wanted to do something that really fit the city individually. Here are a few examples:

This is Talon Gorge. In my world, Talon Gorge is notable because it was the site of the first serious campaign I ever ran. Talon Gorge is characterized by a high clocktower at the center of seven independent districts. So for the image representing Talon Gorge, I found an image that had a tower, and I added a little clockface while tracing it like I explained in the campaign/region map article. The original image only had two other buildings, so I pulled up another reference image on medieval buildings and traced five more in to represent the seven districts. 

This is Vestry. Vestry is the gnomish capital and the most populated single city in my setting. To represent this, I wanted a really bustling, dense city image. I scoured references for fantasy cities until I found one that looked really populated and architecturally diverse, and I was pleased with this result. I really like the look of this massive city in the middle of the Liggen Forest, suggesting how much space it really takes up. 


This is Torga, another city very important to me--it was the site of Listen Check, the podcast I did in 2010, back when D&D actual play wasn't really a thing yet. Torga is a thriving port city, so I made sure to find an image that had a dock (which I expanded from the reference) and a ship that I could have in the ocean beyond the city. Seeing this simplified dock system and ship with the little city reminds me of all the time spent in Torga's waterfront, not to mention Aurora, a character in my now-current campaign who spent time as a sailor stationed there.

Finally, here's Kruush, the orcish capital. It's worth noting that Kruush is not one of the biggest cities in the world. Even smaller cities which lie between the major cities on the map have more people than Kruush. In my world, a massive elven-orcish war decimated two-thirds of the orcish population, after which a huge diaspora sent most remaining orcs away from the homeland to seek a more peaceful life elsewhere. But Kruush is still the most politically important orcish city and the only real major city in the southwest of Evanoch, so I wanted to include it. You'll notice that the city design is basically just huts and shacks around a campfire to represent the continued tribal tradition of the orcs who remained. 

The finished product of this mapmaking process makes me happy. I spent a decade and a half using a rough, unrealistic, and ugly map whenever my players wanted a sense of the world, and I really hated seeing it whenever I would need to reference it for some geographical issue. Taking the time to really nail down a better version will serve me for a long time, and I'm glad I committed to making this map. Here's the finished version with city labels (they obscure some of the land features, but it's the sort of thing that adventurers might use to get settled in Evanoch):


As always, my big advice here is that spending time working on your homebrew setting always yields rewards. I know that having a visual reference for geography and city feel has helped me connect more with my world, and there's some worldbuilding I got to do as a result. I also realized how dense populated the eastern half of Evanoch is compared to the west--I had kind of vaguely known this, but seeing how tightly packed the east is and then the huge stretches of no cities in the west has cemented that and given me some ideas about how to run things in my world. In any case, having a pretty map to share with my players will make me happy for years to come, and I'm proud of the product of this work. 

That's all for now. Coming soon: why open writing is better than closed writing, alternate methods to understanding your character's philosophy besides alignment, and a guide to clans amongst the Faninites. Until next time, happy gaming!


Friday, May 7, 2021

How to Provide Realistic Agricultural Details

Some games call for a removal from reality; a TRPG can be made more exciting at times by resisting realistic measures. But other worlds depend on a realistic and consistent presentation. One detail which has always called to me is the agricultural aspect of the world--I like to have crops grow in ways that are consistent with real-life climates. I do this because it adds variety to the world; not every town subsists on the same foods, and a town can become more memorable for its adherence to a proper reality. In this guide, I will present the agricultural yields which are consistent with our real world using a campaign setting I developed to be realistic in this way. Read on for how you too can develop a realistic gameworld with your crops. 

To begin with, we need a base climate for our gameworld. In the setting I created called Ramsey (a wild west world with D&D technologies), the standard climate is desert: for the most part, this section of the world can support little vegetation. So for most communities, we need crops that can succeed in dry climates. Doing a little bit of research, I find that common crops that can grow in this kind of climate and which can also sustain a community are these: beans, various greens, broccoli, spicy peppers, eggplant, tomatoes, zucchini, and cucumber. So for the average community in Ramsey, these are the staple crops. Hearty meals consist of beans and greens with occasional meals featuring peppers, root veggies, and broccoli. These communities, in large part due to the shortage of arable land, also heavily rely on livestock to supplement meals and provide steady streams of protein. This climate also serves herbs very well, so although they do not sustain people like staple crops, the cuisine of these settlements should be marked with powerful flavors. So, looking at the map of the island, about 60% of all settlements use this method of subsistence and generally manage to get by on what little crops they can manage in the dry heat. Below is an image of Hyder Bend, a large industrial city; its outskirts would be formed of bean and green fields and livestock pastures to support itself, though it's worth noting that a city as big as Hyder Bend would also trade with smaller communities to supplement its food intake. 

This detailed map of Hyder Bend does not include visual representations of agriculture, but the areas to the south and east of town would be home to dozens of fields of dry-climate crops. 

But not every city in Ramsey is as hardscrabble as these settlements when it comes to agriculture. A few locations have land which is more hospitable to farming, namely Hart Springs and Pilgrim's Glen. These small settlements lie on small islands to the west and east of the main continent, and they have wetter climates due to the waterfront effect and can support less hardy crops. The crops we can expect to do well here are more plentiful, so we can select for the crops that are likelier to sustain people at large. The ones that work best for this setting are as follows: barley, beets, cabbage, corn, oats, potatoes, and spinach. Here, we find crops that are naturally filling and which allow for the creation of other food products (barley, corn, oats, and potatoes can all be prepared in a variety of different ways). So the meals in these towns are generally more filling and varied than the rest of the region, and there is a slightly lesser dependence on livestock, although livestock is still common in these areas. These towns, because of their food variety, often export excess crops to other towns. Below are maps of Hart Springs and Pilgrim's Glen; both utilize their climates to maximize town sustenance. 

Hart Springs uses its lush landscape to grow a variety of crops otherwise unavailable in Ramsey. 

Pilgrim's Glen is a dazzling community on a small, lively island, and its crops are eaten all across Ramsey thanks to regular trade. 

There are also communities with unique ecological profiles in Ramsey which affect the agricultural customs. First, there is Red Hawk, a heavily forested settlement known to few, and there is Fink's End, a marshy settlement of quiet outsiders. These settlements also have agricultural trends which define their culinary needs. Let's begin with Red Hawk. 
This secretive map reveals that hollowed-out trees are the homes of the residents. They have created farms in the forest surrounding the hidden town. 

Inside the dense and disorienting forest lies Red Hawk. In my National Treasure campaign, Red Hawk was home to an enclave of werewolves trying to live outside the prying eyes of those who didn't understand the werewolf community. As part of their isolated way of life, they have to subsist on crops they can grow safely within the woods. This calls for consideration of an entirely new biome. The crops that grow naturally in forests are perhaps not as appetizing as other crops: the werewolves cultivate a variety of mushrooms, fruits and berries that grow in the woods, all manner of wild nuts, leeks, and a collection of medicinal herbs. This is not much to subsist on, but that works out, as the werewolves also hunt the animals within the woods for additional nutrition. 
Fink's End lies on a marshy bog; people move about on raised wooden gangways to stay out of the mire. 

Fink's End has a quite different situation. This small society can depend on greater moisture for crops than any other place on the continent. Thus, their crops are quite different, and therefore greatly prized across the continent, as this is the only place certain crops will grow. As you can see from the map of the settlement, I have labeled its major agricultural efforts with the crops that grow naturally in such a setting. These crops are barley, oats, wheat, corn, and rice. Rice in particular is hard to find on Ramsey, so this is a major export for Fink's End. The other grain staples of the community are pillars of Fink's End cooking, as very few livestock can be supported in this climate and the residents must rely on hardy vegetables for a healthy diet. 

These are all examples of settlements that have used what resources they have to make the best of their crops. But a settlement doesn't have to be limited to what they can grow naturally. Consider the settlement of Broken Shield, which has spent considerable resources mastering irrigation and other farming methods to get the most out of their troublesome climate. 
Broken Shield is a progressive city both politically and scientifically; the farms they have built around the city utilize cutting edge technology to feed the city. 

Broken Shield is a city that feels Ramsey is behind the times and caught up in unnecessary hardship, and they combat that with projects like a history museum (oriented toward the future), public housing, and scientific advances in agriculture. I wrote that Broken Shield developed a desalinizing plant which it uses to turn seawater into good water for the crops. So despite its poor location, Broken Shield manages to create enough food to feed itself. The crops that Broken Shield can grow with this method are as follows: leafy greens, broccoli, tubers, and root vegetables like potatoes, onions, and carrots. You'll notice that Broken Shield's crops are a combination of desert crops and temperate crops; the irrigation manages to split the difference and share some of each climate's possibilities. 

So you can see that even a relatively small place like Ramsey can have a variety of climates and crops. And the research process for crops is very simple: just go to google and enter "crops that can grow in [fill in your climate]," and you'll be faced with lists of crops that can match your setting. Remember that you can get creative! Invent new crops that can grow in various settings, for instance; I created a root vegetable that grows in elven lands called "jaswop," which is mostly prized for being brewed into an ale-like beverage, but you could easily create a staple crop or other food that characterizes a region, settlement, or culture. 

When you're considering details like this, remember that such information is mostly for you as GM. Your players will almost certainly have no stake in whether the settlement they're in can grow peas or apples, so only undertake the work of climate design and crop distribution if it will make you happy. Otherwise, you're only compiling details for your gameworld without any meaning. Nevertheless, many GMs insist on creating worlds in dizzying detail, and if that's you, agricultural balance can scratch the itch. Just remember to have fun. 

That's all for now. Coming soon: how to design a custom one-shot from a movie, how to design player character notes on books, and a list of technologies to include in your gameworld. Until next time, happy gaming!
Back to the homepage (where you can find everything!)

Tuesday, March 30, 2021

Material Components: The Physical Tools You Need to Run an In-Person Game

Most of my writing here deals with how to enrich your players' experiences as roleplayers, but there are other details to consider when you want to run a game. Specifically, as a GM, you'll need to have certain props and tools on hand to represent your game in action. There are the basics: dice, maps, and figurines/minis. And now that D&D is more popular than ever, there are a handful of extra tools you can procure to make things even more exciting. At the time of writing, there is a pandemic which has driven most D&D games out of the in-person mode, but we will return to in-person adventures eventually. Let's start with the basics and how to get them.

What every game will need is dice. You can roll digitally with any of the many tools offered for that purpose, but most players and GMs enjoy physical dice more. There's something pleasant about dropping a real die onto the table, and you can't stack digital dice, so you'll probably want to get some physical dice to play. You can get standard sets of the 7 dice pretty much anywhere, but if you're a GM and you're looking to start your collection, I recommend the Chessex Pound of Dice. It's between 80 and 100 dice of varying colors and patterns. Any given set will include a few full sets of mismatched dice. It's okay that they're mismatched--that means that your players get to build custom dice sets, and that's something they'll likely enjoy. 

You can and should also consider getting matched sets of dice. As I mentioned, there are many places to get sets of dice--there are entire companies which do nothing but create dice for tabletop games. I generally recommend starting with Etsy because there are so many good options out there (truly impressive dice sets which are absolutely unique). And you'll be supporting small businesses of gaming-minded entrepreneurs, which means you're contributing to the community. But feel free to branch out; there are more dice on the internet than you can imagine, so find the ones that suit you. I personally have a set of dice in each color to provide my players and myself with options, but whatever works for your game is best for you. 

Once you have dice, it's time to get a map. You have a lot of options with maps. You could grab some posterboard or butcher's paper and draw maps onto the paper, but this often means lots of prep time and it's hard to reuse your maps. You could invest in mapping products, like the ones that build 3D maps, but these can be expensive and difficult to reuse. My preferred method of dealing with the map problem is to go with Chessex again and get a battlemat. Battlemats are affordable, gridded for one-inch squares and hexes sized for miniatures, and endlessly reusable--just draw on it with a wet erase marker and you'll be able to depict any location with just a moment's sketching on the vinyl mat. Erasing is as easy as running a damp rag over the mat. If you get a multi-color pack of markers, you can depict a decent level of detail. And even if you're not a visual artist, your drawings will be enough to give your players a sense of what is where, and that's all that matters. 

An important consideration with maps for the average session is that it be the right size. Chessex offers three sizes of battlemat, and the smallest size is enough for most encounters. But for larger engagements that actually resemble a battlefield, you may need to go up a size. The largest size mat is big enough that many tables will struggle to hold it all, but the middle sized mat (the Megamat) is about appropriate for almost anything. I personally have one Megamat and two Battlemats (the small one), and I will usually draw a central location like a favorite tavern or an NPC's headquarters on one of the Battlemats and leave it for when the players return to it; I use the Megamat for encounters. Whatever strategy you choose, be ready to make the most out of your map. 

Finally, now that you have a map to put them on, you might want some miniatures. There are, like with dice, nearly endless places to find minis. You can shop individual minis at many sites like Miniature Marketplace, but for GMs starting their collections, there is a much more cost-effective way to build your mini army. My secret was eBay. If you browse eBay for D&D figures, you'll find entire collections of pieces for very cheap. An average individual piece at Miniature Marketplace will run about $8, but on eBay, you can get lots of pieces at a rate of about $1-$2 per piece. I managed to get a collection of about 200 pieces for $100 as well as sets of early D&D figures by renowned artists for very little money. My collection of D&D minis currently sits at about 1,000 pieces, which provides a great deal of customization for my players when they choose pieces. 

How will you store your impressive collection of minis now that you have them? I recommend tackle boxes (the fishing accessory). These handy boxes will allow you to easily transport your minis while keeping them organized. I personally have my minis organized by what weapon the figure is holding, and a tackle box keeps your pieces in order without any effort. Something like this will work well, but browse your options and consider which boxes will suit you best. What matters the most is that you get what you need from your materials, and it's important that you can rely on the organization you select. 

There are generally two kinds of minis you can obtain. There are the classic pewter or otherwise metal pieces, and there are plastic pieces. The metal pieces will always cost more--look for collections of them to make the most of your money. The metal pieces can be more attractive as options if you're looking to paint your minis, but you can paint a plastic piece as well. I'm not a committed mini painter--I've done a few, and they are very much the prize gems in my collection--but your own interest will guide you here. Getting into painting pieces is a pricy investment, so you may find that after obtaining all the necessary materials to play, you may need to put painting on the back burner. But if painting the minis is part of the appeal of the game, get in there and beautify your minis!

Since we're addressing necessary physical components, let me add this to your shopping list: paper and pencils. Even if you're using digital character sheets, the players should have access to scrap paper for taking notes, keeping a character journal, and otherwise tracking important information. Even more importantly, I recommend buying a multi-pack of mechanical pencils for your players. People need to be able to make erasable notes on their character sheets, and no one wants to stop to sharpen a pencil mid-game; the humble mechanical pencil resolves both of those issues. Make sure to have plenty on hand when you play. 

One simple prop that can help your game is a basic whiteboard. You're already using wet erase markers for your maps, and there are many applications of a whiteboard. You can get a small tablet for cheap, and I recommend recording initiative orders on the board and displaying it--this way, your players can easily reference the combat order and be ready on their turns. You can also write riddles on the board so players can mull over the details without your having to repeat them. And it always helps to be able to draw symbols and diagrams without cluttering up your map. A whiteboard is simple, but it has many helpful applications in a game.

As I have said, D&D has never been more popular, and as a result, there are more game aids you can buy than ever before. Many players like the thrill of dice towers--not a stack of dice, but a physical tower with randomizing bumps you can drop your dice into. Etsy again has a great stock of these, both in the form of ready-made towers and designs you can build yourself. And if you're sufficiently practical and creative, you can design your own. All it takes is looking at some designs and crafting your own take on it. 

A tool which can be helpful especially to beginning players that is new to 5th edition D&D is spellbook cards. Wizards of the Coast recognized the complexity of spellcasting and locating all the details of each spell, so they released the spellbook cards, which place every detail of a spell on a playing card-sized card so that spellcasters can simply leaf through the cards and know what they need to cast the spell. As I mentioned, these are great for beginning players, but even experienced players can benefit from the help offered by these cards. They can be a little pricy depending on where you look, but they are well worth the benefit. I have the cards for each class as well as two sets of the Arcane spells since three classes use them and there are sometimes more than one arcane spellcasters in a party. If you're like me, you'll want to keep these cards organized by spell level, so ask your players to be considerate of how they're organized. 

Likewise, you can add all manner of D&D peripherals to your game experience. Many players like to have a dice tray or other designated place to roll dice without the threat of losing them. Some players like to punish misbehaving dice with a turn in dice jail. And there are dozens of options for more specific tracking items, like inspiration trackers, spell slot trackers, and condition markers. I don't use many accessories like this, but they can be very helpful in making all of combat's complicated details more visible. The key to picking which tools will help you is in asking this question: Does this improve my players' experience of the game? If so, go for it; if not, save your money and make your game more special with your creativity. 

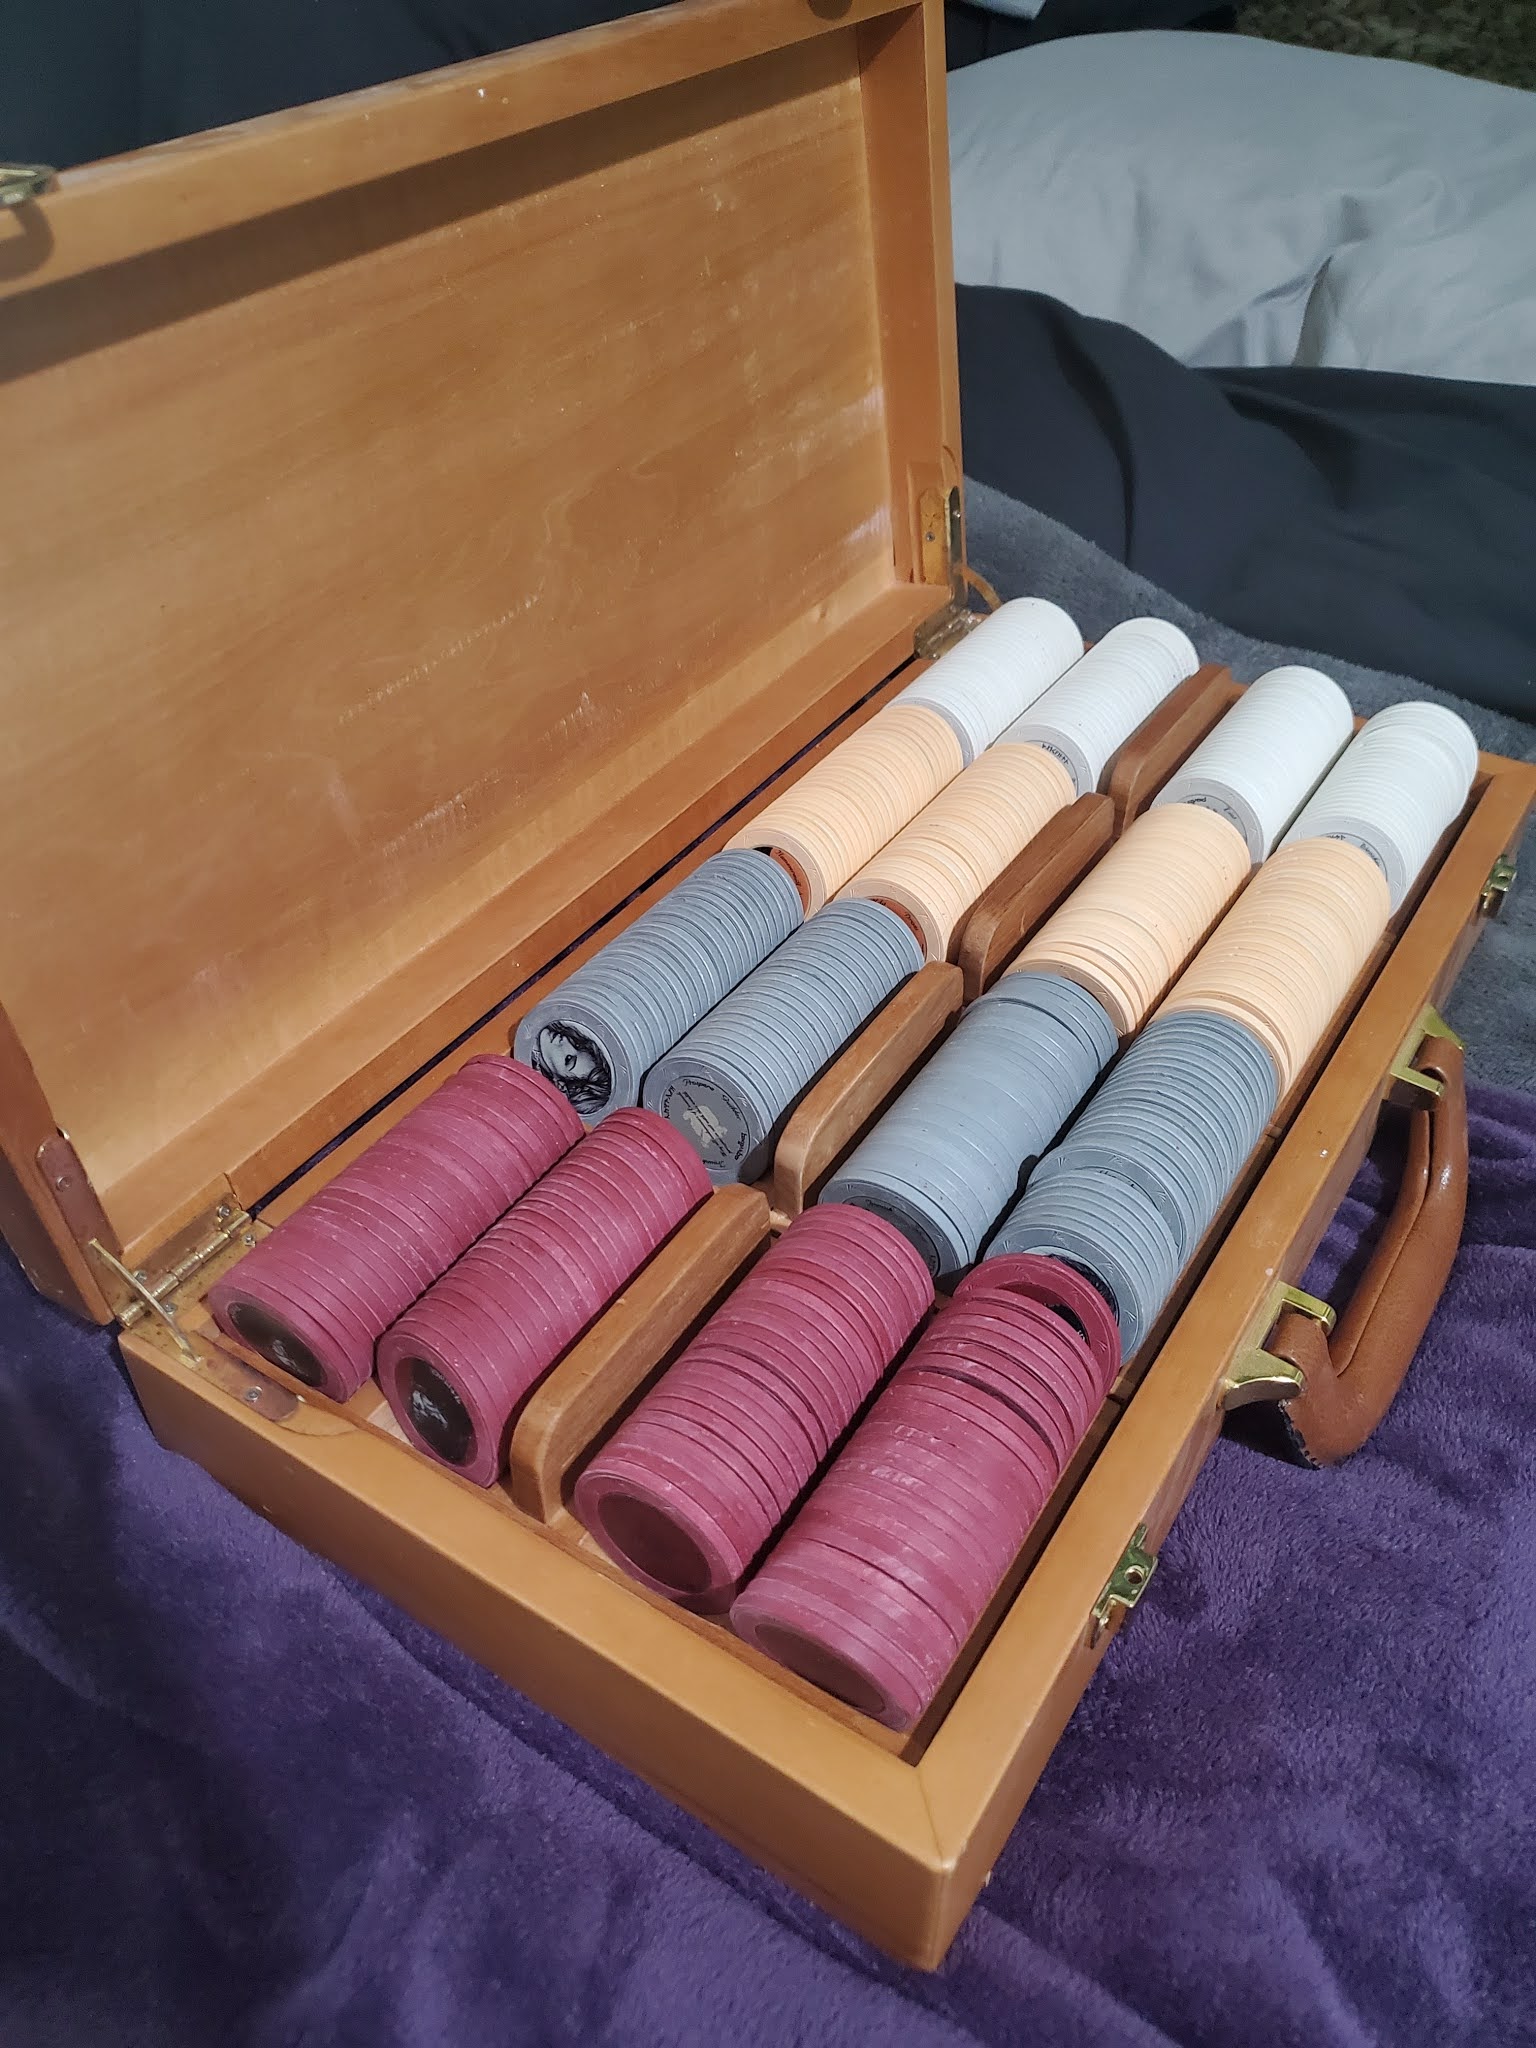
One physical item I have obtained which I think has been a bonus to my playing experience is something I had custom made. When I first designed my homebrew setting, I wrote that there was an inter-governmental treaty to share a common currency (my way of explaining how several different societies shared one monetary system). I designated who was on each coin and why--the orcish leader at the time appeared on the platinum piece because the orcish lands were richest in platinum deposits, for example. I designed images to appear on each coin and had custom poker chips made, so now I have a collection of chips that all look like my in-game currency. I'm proud of how they look, and when I have players engage in a real card game like Three Dragon Ante, they can use facsimiles of real D&D money. 


The designs for my homebrew currency. 


To make these coins, I selected portraits of D&D races that I liked as representations of the world; then I came up with translations for each metal for the circular text. I used a silhouette of the continent of the homebrew setting and a quote from the halfling who called for the coining of a common currency. This is a bit of a screwball when it comes to D&D accessories. No one really needs to have currency simulators, and in fact, the first custom chip company I contacted found my design so strange that they refused to do it (perhaps if I had asked for naked ladies on the chips, they would have agreed, since that appeared to be their main business). But I was passionate about my homebrew design for money, and having physical coins can be great for roleplaying experiences. I recommend that if you are passionate about an element of your homebrew setting and you conceive of an idea for how to bring it to life, do it! Your players will recognize and feed off of your passion, and the game will be richer for it. 

The coin chips in their carrying case. 

This may come as a surprise after this list of possible peripherals, but my bottom line advice is this: you don't really need any materials to play beyond character sheets. If you're looking to become a GM with all the materials, these will get you well on your way to that goal. But if you're simply looking to get players invested, you can do a lot more with a twisty story than you can with accessories. Remember that the most important thing is that your props and accessories help your players engage. If players are ignoring initiative order because they won't stop rolling with the dice tower, you may need to reevaluate what the real role of your accessories is. But by and large, tools like these will help players get invested more easily. Whatever routes you choose for your D&D peripherals, have fun! These tools amount for the most part to toys, and toys should be fun. 

Hopefully, this guide helps you to get a grip on the many decisions you'll face about how to run your game as a GM. Coming soon: how to build a cohesive party, alternate uses for my expanded Wild Surge Table, and why I believe TRPGs are the most interesting games of our time. As always, if there's something I didn't cover here or you would like to see written about here, comment below! Until next time, happy gaming!

Back to the homepage (where you can find everything!)